

Hey there, fellow farmers and agricultural enthusiasts! I'm a supplier of top - notch ploughs, and today I'm gonna walk you through the process of attaching a plough to a tractor. Whether you're a newbie in the farming game or just looking for a refresher, this guide is for you.
Why Attaching a Plough Properly Matters
Before we dive into the steps, let's talk about why it's so important to attach a plough to your tractor correctly. A well - attached plough ensures efficient tilling. It distributes the load evenly across the tractor, preventing unnecessary wear and tear on both the tractor and the plough. Moreover, it guarantees a smooth and consistent ploughing operation, which is crucial for preparing your fields for planting.
Tools You'll Need
First things first, gather the necessary tools. You'll need a set of wrenches, which come in handy for tightening bolts and nuts. A jack might also be required if you need to lift the plough slightly to align it with the tractor's hitch. And don't forget a good pair of gloves to protect your hands from dirt, grease, and sharp edges.
Step 1: Prepare Your Tractor and Plough
Park your tractor on a flat, stable surface. Make sure the engine is turned off, and the parking brake is engaged. This is a safety measure to prevent any accidental movement during the attachment process.

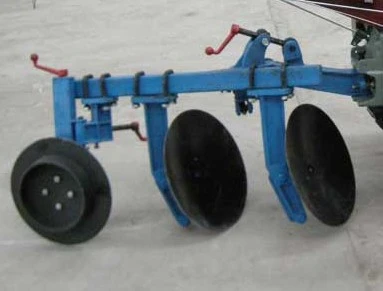
Now, take a look at your plough. Inspect it for any signs of damage, like bent parts or loose bolts. If you notice anything amiss, it's best to fix it before proceeding. As a plough supplier, I always recommend regular maintenance of your equipment to ensure its longevity.
Step 2: Align the Hitch
Most tractors have a three - point hitch system, which is designed to connect various farm implements, including ploughs. The three - point hitch consists of two lower lift arms and a top link.
Start by adjusting the height of the lower lift arms of the tractor's hitch. You want them to be at the same height as the attachment points on the plough. This alignment is crucial for a proper connection. You may need to use the tractor's hydraulic controls to raise or lower the lift arms.
Step 3: Connect the Lower Lift Arms
Once the lift arms are at the right height, carefully back the tractor up to the plough. Line up the holes on the lower lift arms with the corresponding holes on the plough's attachment points. Insert the pins through the holes to connect the plough to the tractor. Make sure the pins are securely in place. You can use a cotter pin or a clip to prevent the main pins from coming out.
Step 4: Attach the Top Link
The top link is the third part of the three - point hitch system. It helps to control the angle and stability of the plough. Connect the top link to the appropriate attachment point on the plough and the tractor. You may need to adjust the length of the top link to ensure the plough is level. A level plough will give you a more even tilling depth across your field.
Step 5: Check the Connection
After attaching all the parts, give the plough a gentle shake to make sure it's firmly connected to the tractor. Check all the pins and bolts to ensure they are tight. If you find any loose connections, tighten them immediately.
Step 6: Test the Hydraulics
Turn on the tractor's engine and engage the hydraulic system. Use the hydraulic controls to raise and lower the plough a few times. Observe how the plough moves. It should go up and down smoothly without any jerks or unusual noises. If you notice any problems, like the plough not lifting properly or making strange sounds, there might be an issue with the connection or the hydraulic system.
Types of Ploughs and Their Attachment
There are different types of ploughs available in the market, each with its own unique features and attachment requirements. For example, a disc plough is great for breaking up hard soil, while a double plough can cover more ground in less time.
If you're interested in a Good Quality Double Plough, it offers excellent performance and durability. Our Hot Sale Disc Plough is also a popular choice among farmers for its efficiency. And if you're on a budget, our Cheaper Double Plough provides a cost - effective solution without compromising on quality.
Tips for a Successful Attachment
- Read the manual: Both your tractor and plough come with user manuals. Make sure to read them carefully before attempting to attach the plough. They contain valuable information about the specific attachment process and safety precautions.
- Get help if needed: Attaching a plough can be a bit tricky, especially if it's your first time. Don't hesitate to ask a more experienced farmer or a colleague for assistance.
- Regular maintenance: After attaching the plough and using it in the field, make sure to clean and lubricate the connection points regularly. This will prevent rust and ensure smooth operation in the future.
Conclusion
Attaching a plough to a tractor is not as complicated as it may seem. By following these steps and taking the necessary precautions, you can do it safely and efficiently. As a plough supplier, I'm always here to support you in your farming journey. If you have any questions about ploughs, attachment, or need help choosing the right plough for your needs, don't hesitate to reach out. We can discuss your requirements and find the best solution for your farm.
References
- "Tractor and Farm Equipment Operation Manuals"
- Agricultural Engineering Textbooks on Farm Implement Attachments


